
BuddyGroups Tutorial 1: User Profiles
OBJECTIVE: LEARN TO MANAGE YOUR USER PROFILES
Step 1: Selecting your contact information
The first time you use Buddy Groups, Buddy Groups will automatically prompt you to select or create a contact entry to use as the source of your contact information (see Figure 4). If you have already chosen a contact but want to reset your contact information now, you will have to navigate to the selection screen yourself. Start by tapping on the “Settings” button on the start screen’s main menu.

The image above shows the menu buttons that should appear at the bottom of the start screen. “Settings” is the button on the right-most side.
You will see a new screen that looks similar to this:
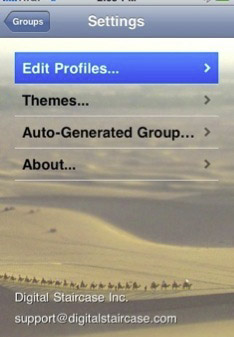
Tap on the “Edit Profiles...” entry in the Settings list. You will be brought to a screen that resembles this:
Note: If you have not selected your contact information before, you will not see a name, portrait picture, or contact information.
Tap on the “Edit” button in the top right corner of the screen. A few options will appear:
Create New Profile:
Select this option if you would like to create a new entry in your device’s address book and use it as your Buddy Groups contact information.
Load from Address Book:
Select this option to use an existing contact from your device’s address book.
Note : Apple usually includes your own contact information in your device’s address book. Thus, it is usually easiest to “Load from addressbook” to set your contact information in Buddy Groups.
Edit Current Profile:
Select this option to keep using the current contact information but need to change a few fields (phone number, email, address, homepage, etc).
Note: “Edit current profile” will only appear if you had previously selected your contact information.
Designer’s note:
Creating, loading, or editing a profile contact will appropriately create, use, or edit a contact from your iPhone/iPod’s address book. Changes made in Buddy Groups will be reflected in your device’s address book.

Step 2: Defining Profiles
Once you have selected (or created) your contact information, it is time to define your profiles. On the bottom of the screen, you will notice four menu buttons: “Full Profile,” “For Business,” “For Friends,” and “Custom Profile.”
Full Profile:
When this is selected, Buddy Groups simply displays all your contact information.
For Business, For Friends, and Custom Profile:
The other three buttons help you define what information you would like to share when each of those profiles (business, friends, or custom) are selected during the process of trading contact information.
Defining the profile:
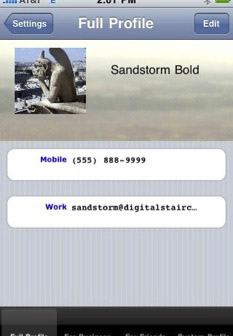
We will now define the information that will be shared for the business profile. Tap on the “For Business” menu button. The screen will show you something like this:

Notice the check mark on the right hand side next to the listed phone number. This means that Sandstorm Bold’s phone number will be shared whenever the “Business” profile is selected for (WIFI or Bluetooth) transfer. To select or de-select a field, simply tap on the information. (i.e., tap on the phone number once to de-select it. Then tap again to re-select it). A check mark will appear/disappear when the information is selected/de-selected.
To define what information is shared for the “Friends” and “Custom” profile, simply tap on the “For Friends” or “Custom” menu buttons at the bottom of the screen and check all information you would like to share for the respective profiles.

You are now ready to use Buddy Groups to email contact groups and share your contact information!
Figure 4: Choose or create a profile that
contains your contact information.
Figure 1: The main menu.
Figure 2: Settings menu list.
Figure 3: Contact info & profiles. Entries will be blank until you choose a contact.
Figure 5: Contact information.
Figure 6: Business profile is active (see bottom menu highlight). Check mark indicates information associated with the business profile.